
Nginx + Certbot (New and Automatic Updates)
This manual provides instructions for configuring server certificates. It does not cover Nginx installation or command meanings, please refer to relevant websites or reference books for that information. This procedure was verified using the following environment:
- OS: RHEL9
- Web server application: nginx/1.20.1
- ACME lient: Certbot2.6.0 Atlas account, API Key, MAC Key
The following procedure is an example of how we conducted operational verification and does not guarantee operation. Please note that we cannot be held responsible for any changes or errors in this procedure. For details, please refer to the documentation of each application.
Nginx is an open-source application. Please check for information on vulnerabilities and other issues at any time, and if any problems are found, please take sufficient care in its operation, such as stopping the service in question or promptly applying any patch that has been released.
NOTE: The commands executed in this procedure are the same for both Linux and Ubuntu environments.
Install Certbot
-
Install certbot in your Linux environment by executing the following commands in order:
sudo yum install -y certbot python-certbot-nginx
NOTE: An additional package set called EPEL release is required for Certbot installation. If you are unsure whether it is installed, please execute the following command:
dnf install epel-release
If there is no response after executing the above, please install it using the following command:
dnf -y install https://dl.fedoraproject.org/pub/
epel/epel-release-latest-9.noarch.rpm
After installation, please execute the `dnf install epel-release` command again.
-
Configure your system in advance to allow access to the website where you will be setting up the certificate.
-
For pre-configuration of certbot, please obtain the Key ID: <API-KEY> and ACME MAC: <ACME-MAC> from the Atlas portal.
For instructions on how to obtain these from the Atlas portal, please refer to the following pages:
• How to obtain API Credentials
• How to obtain ACME MAC -
Link your account
-
Execute the following command to link your account:
certbot register -m ' mail@example.jp ' --agree-tos --eab-kid ' KeyID ' --eab-hmac-key ' MACkey ' --server 'https://emea.acme.atlas.globalsign.com/directory'
NOTE: The parts in bold are examples, please adjust them according to your environment.
-
After entering the information, you will be asked to confirm (Y)es/(N)o. Enter Y (y) and then press the Enter key.
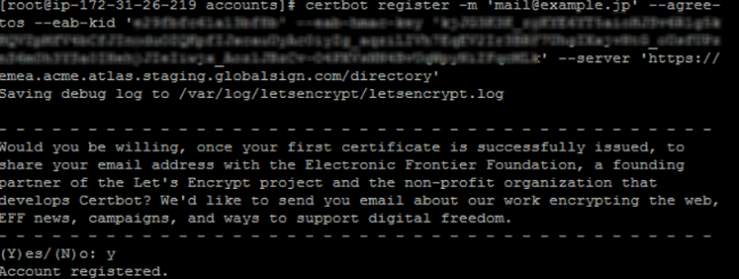
-
If you have already configured information for a different Certificate Authority or a different Atlas account, you can re-register by deleting the target directory.
/etc/letsencrypt/accounts/ FQDN /
NOTE: Please specify the FQDN part of the URL used during the linking process for "FQDN".
-
Certificate Issuance and Automatic Renewal Settings
-
To issue and bind the certificate, execute the following command:
certbot run --nginx -d www.example.com --key-type rsa --server 'https://emea.acme.atlas.globalsign.com/directory'IMPORTANT: Specify the common name of the certificate to be applied. When specifying multiple FQDNs, separate them with a comma (e.g. example.jp,www.example.jp). By specifying multiple FQDNs, a single certificate will be issued in which all of those FQDNs are listed under the SAN (the domain name for which the server certificate is set and used).
Successful response (sample response)
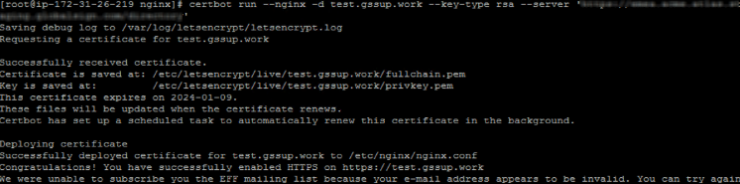
• The issued certificate can usually be found in the following directory:
- Certificate: /etc/letsencrypt/live/${FQDN}/fullchain.pem
- Private key: /etc/letsencrypt/live/${FQDN}/privkey.pem
• ${FQDN} represents the FQDN of the web server where the certificate was configured.
• /etc/letsencrypt is a directory generated by Certbot with default settings.
-
Access the configured FQDN from your browser and verify that the certificate is set.
- To automate server certificate renewal, use the crontab command and execute the following command to open the cron settings screen:
crontab -e - The following will be written:
* */30 * * sudo certbot renew
• Certificates can be renewed 30 days before their expiration date.
• Even if you apply for renewal outside the renewal period, you can do so on a designated date and time, but no certificate will be issued.
The value specified in "*" indicates the date and time of execution. Please refer to the information below for details.
*Position (from left)
frequency
Possible values
1
minutes
0-59
2
time
0-23
3
day
1-31
4
month
1-12
5
day of week
0-6 (0 Sunday, then in order)
Example 1: When to run every 30 days
* * */30 * * sudo certbot renew
Example 2: When executing on the 15th of March, June, September, and December at 7:10 AM.
10 7 15 3,6,9,12 * sudo certbot renew
Perform a Forced Update
The following command allows you to forcibly renew your certificate even if it has more than 30 days remaining until its expiration date.
certbot renew --force-renewal
NOTE: elect this option if you need to replace your certificate urgently. If a large number of certificates are issued continuously, the server may restrict applications.
Obtain a Wildcard Certificate
There are two ways to obtain a wildcard certificate with Cerbot:
Method 1: Using a domain already registered with the Atlas portal
Requirements:
- The parent domain must be registered with the Atlas portal using DNS authentication or email authentication. Atlas Portal Domain Management :: GlobalSign Atlas Documentation
- Create an API key and ACMEMAC from the profile with the registered parent domain and use them in the request. NOTE: Use the certificate issuance command on this page.
Method 2: Using Cloudflare's DNS
Requirements:
- DNS plugin installation
[Installation command]
- Certbot has plugins available for each available DNS service, but they are separate packages, so install the Cloudflare plugin.
- Create a Cloudflare account (free)
- Change the DNS name servers for the target domain to Cloudflare.
- Obtain and save Cloudflare API tokens
- A file containing the Cloudflare API Token is required when making a request, so create a dedicated file on the server side.
Example: Add the following to [/etc/letsencrypt/cloudflare.ini]
- Execute the certificate issuance command.
NOTE: If you wish to issue a wildcard certificate, enter *. for the hostname.
Some Certbot subcommands and options related to ACME accounts
Command
Explanation
Register
• Create an ACME account.
-m 'MAIL'
Specify the email address to be used for your ACME account.
(Specifying options on the command line is optional, but if you do not specify one, you will be interactively prompted to enter it.)--agree-tos
• I agree to Globalsign's Terms of Service.
(Specifying options on the command line is optional, but if you do not specify them, you will be interactively prompted to enter them.)--eab-kid 'KID'
Specify your ACME account authentication information (Key ID). Obtained from the Atlas portal.
--eab-hmac-key 'HMAC-KEY'
- Specify your ACME account authentication information. (ACME MAC). Obtained from the Atlas portal.
--server 'SERVER'
Specify the server host to which the application will be submitted.
Please enter a fixed value like the following:
Example: 'https://acme.globalsign.com/directory'
Some Certbot subcommands and options related to certificate issuance
Command
Explanation
-d
Specify the Fully Qualified Domain Name (FQDN) for which the certificate will be issued. Multiple FQDNs can be specified by separating them with commas.
--apache
We will use an Apache plugin to automate certificate issuance and installation. The authentication method used will be file authentication.
--key-type
Specify the RSA.
In Certbot 2.0.0 and later, the application will fail if you do not specify it.