Overview
This guide walks you through the complete process of securing your Kubernetes Ingress using cert-manager with GlobalSign’s Atlas-ACME server and the DNS-01 challenge type. At the completion of this article, you'll learn how to:
- Set up a Kubernetes cluster with Kops and AWS
- Install and configure cert-manager
- Set up NGINX Ingress Controller
- Configure GlobalSign Atlas Issuer and Certificate using DNS-01
- Secure an Ingress resource with a trusted TLS certificate
What is Ingress?
Ingress exposes HTTP and HTTPS routes from outside the cluster to services within the cluster. Traffic routing is controlled by rules defined on the Ingress resource.
Here is a simple example where an Ingress sends all its traffic to one service:

Guidelines
-
AWS Ubuntu EC2 Instance - Use the AWS documentation for creating Ubuntu Instance
-
Create A User in IAM
a. Go to IAM Console and select Users
b. Click on create user
c. Give a name to the user
d. Fill the checkbox of "Provide user Access to the AWS Management Console"
1. Select "I want to create an IAM user "
2. In Console Password, choose "Autogenerate Password" or "Custom Password" based on your choice.
3. Click "Next" in the bottom right corner.
e. In Set Permissions, choose
1. Select "Add User to a group" in case if you already have defined policies for a particular user group, otherwise choose "Attach Policies directly".
2. In Permission Policies, provide the following permissions to the user(Note:- You can provide permissions based on your own requirements as this is just for the example purposes.)
a. VPCFullAccess
b. EC2FullAcces
c. S3FullAccess
d. Route53FullAccess
e. IAMFullAccess
f. Click "Next" in the bottom-right corner
Prerequisites
Ensure the following tools are installed and configured on your system:
- unzip
- AWS CLI
- Helm
- kubectl
- kops
- Create S3 bucket
- Create one hosted zone from Route53
Note: The name of the zone either same as bucket name or should be succeed-er of bucket name for example if bucket name is example.com then hosted zone name should be abc.example.com. - SSH key pair
Install Unzip
sudo apt install unzip
Install AWS CLI
curl "https://awscli.amazonaws.com/awscli-exe-linux-x86_64.zip" -o "awscliv2.zip"

unzip awscliv2.zip

sudo ./aws/install
Install Helm
     curl -fsSL -o

get_helm.sh https://raw.githubusercontent.com/helm/helm/main/scripts/get-helm-3

     chmod 700 get_helm.sh

     ./get_helm.sh
There are few policies required to run the cluster successfully which should be assigned to a user and a role for the cluster:
IAM URL: https://console.aws.amazon.com/iamv2/home#/home
Create a user for k8s cluster and assign the below policies:
- Go to Users
- Add users
- Give a name to user
- Select Access key - Programmatic access
- Permissions
- Select Attach existing policies directly and select the below policies for this user.
a.) VPC full access
b.) EC2 full access
c.) S3 full access
d.) Route53 full access
e.) IAM full access
Create a role for k8s cluster and assign the below policies:
- Go to IAM dashboard https://console.aws.amazon.com/iamv2/home#/home
- Roles
- Create role
- Form common use case select EC2 and go to next screen for permissions
- Select the below permissions for this user
a.) VPC full access
b.) EC2 full access
c.) S3 full access
d.) Route53 full access
e.) IAM full access
Launch an Ec2-Instance and assign this role to the instance.
Install kubectl
# kubectl

curl -LO "https://dl.k8s.io/release/$(curl -L -

s https://dl.k8s.io/release/stable.txt)/bin/linux/amd64/kubectl"
#make the downloaded file executable
chmod +x kubectl
#Move the executable to the /usr/local/bin
sudo mv kubectl /usr/local/bin
Install kops
curl -LO https://github.com/kubernetes/kops/releases/download/$(curl -

s https://api.github.com/repos/kubernetes/kops/releases/latest | grep tag_name | cut -d '"' -

f 4)/kops-linux-amd64
#Make the binary executable
chmod +x kops-linux-amd64
#Move the executable to /usr/local/bin
sudo mv kops-linux-amd64 /usr/local/bin/kops
In order to work further need to login with the above created programmatic user:
aws configure
#enter the Access key ID and Secret access key.
#Provide the region details i.e., us-east-1 or any other
#Give output format as "json".
#Create a S3 bucket through S3 bucket console: https://s3.console.aws.amazon.com/s3/home?region=us-east-1
#Create a private hosted zone from Route53 console: https://console.aws.amazon.com/route53/v2/home#Dashboard
#Generate public and private keys
Set Up Kubernetes Cluster
export KOPS_STATE_STORE="s3://your-s3-bucket-name"

export MASTER_SIZE=${MASTER_SIZE:-m4.large}

export NODE_SIZE=${NODE_SIZE:-m4.large}

export ZONES="us-east-1a,us-east-1b,us-east-1c"
kops create cluster pki.atlasqa.co.uk --node-count 3 --zones $ZONES --node-size $NODE_SIZE --master-size $MASTER_SIZE --master-zones $ZONES --dns public --dns-zone pki.atlasqa.co.uk --cloud aws
#It will describe everything that it will create within the cluster in next step kops will update the cluster and resources would be created
kops update cluster --name pki.atlasqa.co.uk --yes --admin
#It will take around 20min to get all the resources ready within the cluster.

#Check the cluster status after 20min with below command
kops validate cluster --name pki.atlasqa.co.uk
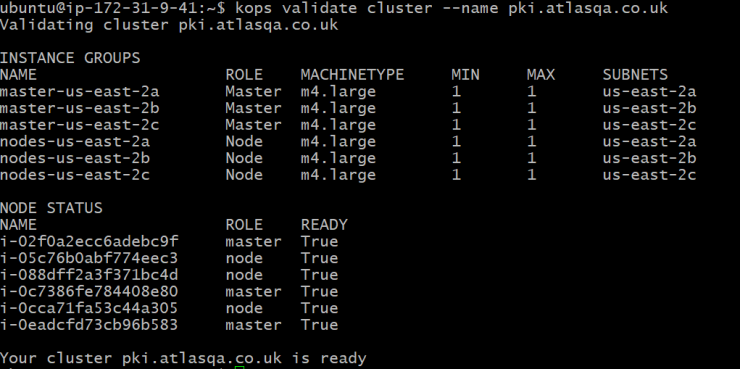
The cluster is setup, there are 3 node machines running in us-east-1 region and 3 master running in us-east-1 as per the availability zones.
Install cert-manager
kubectl create namespace cert-manager

helm install  cert-manager jetstack/cert-manager --namespace cert-manager --create-namespace  --set installCRDs=true --set 'extraArgs={--dns01-recursive-nameservers-only,--dns01-recursive-nameservers=8.8.8.8:53}'
Add the jetstack repo to helm
helm repo add jetstack https://charts.jetstack.io

helm repo update
Install Nginx-ingress-controller in namespace cert-manager and create A record to your DNS Zone
helm upgrade --install ingress-nginx ingress-nginx --repo https://kubernetes.github.io/ingress-nginx --namespace cert-manager
Add an A record to your DNS zone
kubectl get svc -n cert-manager
The ingress-nginx controller would have the external IP, Add that IP as A record in DNS host.
Configure GlobalSign Atlas-ACME Issuer
Step 1: Set Up account binding key as a secret within Kubernetes
kubectl create secret generic eab-secret --from-literal secret=HMAC_key -n cert-manager
Step 2: Set up the GlobalSign as issuer/ClusterIssuer
kubectl apply -f issuer.yml -n cert-manager
issuer.yml
apiVersion: cert-manager.io/v1
kind: Issuer
metadata:
  name: issuer-gs
  namespace: cert-manager
spec:
  acme:
    server: https://*******/directory
    email: *********
    externalAccountBinding:
      keyID: ************
      keySecretRef:
        name: eab-secret
        key: secret
      keyAlgorithm: HS256
    privateKeySecretRef:
      name: account-private-key-secret
    solvers:
      - dns01:
          route53:
            accessKeyID: AKIA3UZDDYFT7EMKGS2R
            region: us-east-1
            secretAccessKeySecretRef:
              key: secret
              name: dns-secret
Step 3. Create certificate resource
kubectl apply -f cert.yml -n cert-manager
cert.yml


apiVersion: cert-manager.io/v1

kind: Certificate

metadata:

  name: eab-cert

  annotations:

#    cert-manager.io/issue-temporary-certificate: "true"

#    acme.cert-manager.io/http01-edit-in-place: "true"

  namespace: cert-manager

spec:

  secretName: acme-account-secret

  duration: 2160h

  renewBefore: 360h

  commonName: pki.atlasqa.co.uk

  dnsNames:

  - pki.atlasqa.co.uk

  issuerRef:

#    name: aeg-eab

#    name: acme-issuer

    name: issuer-gs

#    kind: ClusterIssuer

    kind: Issuer
Step 4. Securing ingress resource
kubectl apply -f ingress.yml -n cert-manager
ingress.yml
apiVersion: networking.k8s.io/v1

kind: Ingress

metadata:

  name: nc-s

  namespace: cert-manager

  annotations:

    cert-manager.io/issuer: issuer-gs

    kubernetes.io/ingress.class: nginx

    cert-manager.io/acme-challenge-type: dns01

#    acme.cert-manager.io/http01-edit-in-place: "true"

spec:

  rules:

#  - host: nc-s.default.svc.pki.atlasqa.co.uk

  - host: pki.atlasqa.co.uk

    http:

      paths:

      - pathType: Prefix

        path: /

        backend:

          service:

#            name: nc-s

#            port:

#              number: 16000

            name: nginx

            port:

              number: 80

  tls:

  - hosts:

#    - nc-s.default.svc.pki.atlasqa.co.uk

    - pki.atlasqa.co.uk

    secretName: eab-secret
Video Demo: https://asciinema.org/a/cAbCNQskDaKkEKUOjbm2UpKY8
If all steps are followed correctly, access your domain over browser you would get your domain accessible over https protocol with GS cert.